
While developing my first serious app using SwiftUI I was continuously impressed about how fast UI development had become using SwiftUI, especially if the pre-provided views already support your use case. And while of course for any kind of custom UI we will still need to write our custom views, combining the existing ones and adjusting them with modifiers and such, I would expect SwiftUI to support at least the most common views that developers might need to present data and accept input from users.
If this were the case, SwiftUI could even be used for prototyping where a “working but not beautiful” version of an app idea could be quickly built and shown to users to verify if the app idea has any chances of success. Also, this way one could also quickly gather feedback about which parts actually need a much better understandable UI (the parts not yet understood well) and which could be mostly kept to the default components with some visual adjustments.
In other words: SwiftUI in my eyes has the potential to make MVP-driven product development much more interesting to many more developers which is definitely a good thing as it saves a lot of time that would otherwise be invested in things that would eventually turn out to fail in one way or another. This goes in line with the Lean Startup methodologywhich I think is a great way to tackle any kind of new product.
The Current State of SwiftUI
For this to be possible, I would expect SwiftUI to already cover all common types of input that might be needed in forms, like for user registration or other kinds of data, as many types of apps, in the end, are nothing else than a form that accepts input data, transforms it in some way and presents data back in a special way or time. Unfortunately, SwiftUI isn’t quite there yet.
The approach Apple seems to be taking with SwiftUI is to consider which are the most missing components in SwiftUI and adding some of them each year. For example, at WWDC 2020 they added ProgressView, Gauge, Image support within Text and improved a lot of other details of existing views, both for performance and more flexibility. At WWDC 2021 they’ve added multiple async/await related APIs, such as AsyncImage or the .refreshable and .task view modifiers, amongst other improvements & additions.
The upside of that approach is, once something is added to the framework, one can expect it to exist and work in the same manner for a long time, so no big code changes are needed with every release (like it was for Swift as a language before Swift 4). The downside is that many components are still missing. And that’s where I think the community can jump in to provide temporary solutions that can be easily replaced by official components provided by Apple sometime in the future.
Implementing a Multi-Selection View Component
In this post, I would like to focus on one such component and provide my initial solution for it: A multi-selector to choose multiple options out of a given set of options. As of now Apple does provide a Picker, but it doesn’t support the selection of multiple entries and even automatically leaves the list screen once a single choice was made. So let’s get right to it and fix that!
What kind of data structure could require a multi-selector? Let’s have a look at this example:
struct Goal: Hashable, Identifiable {
var name: String
var id: String { name }
}
struct Task {
var name: String
var servingGoals: Set<Goal>
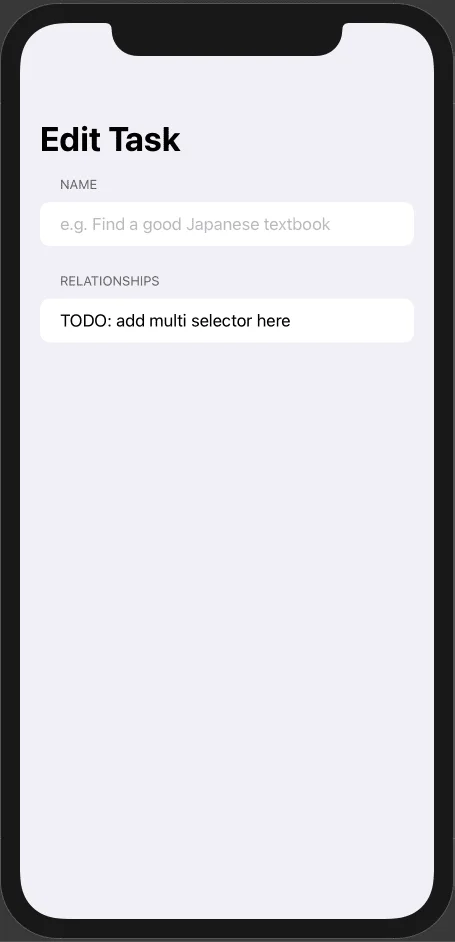
}So basically, in our app we have a collection of goals and a collection of tasks. And we want to model the relation describing which goals each task serves. When creating or editing a Task we want to select which goals the task is serving. Here’s the SwiftUI code for a TaskEditView:
import SwiftUI

struct TaskEditView: View {
    @State
    var task = Task(name: "", servingGoals: [])

    var body: some View {
        Form {
            Section(header: Text("Name")) {
                TextField("e.g. Find a good Japanese textbook", text: $task.name)
            }

            Section(header: Text("Relationships")) {
                Text("TODO: add multi selector here")
            }
        }.navigationTitle("Edit Task")
    }
}

struct TaskEditView_Previews: PreviewProvider {
    static var previews: some View {
        NavigationView {
            TaskEditView()
        }
    }
}
The above code renders to this preview:
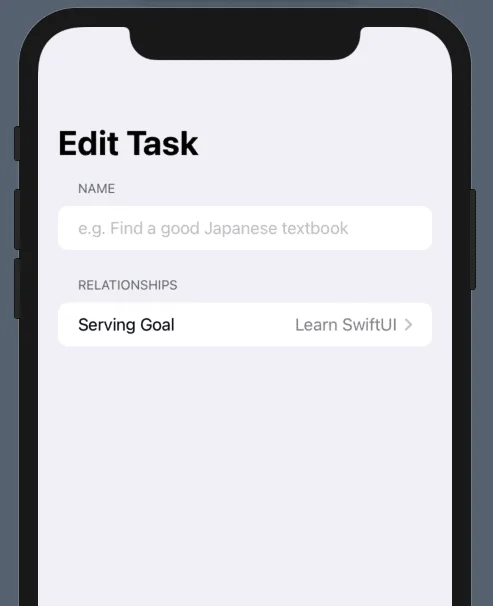
To show off, how things would work if we only had one goal to serve, we could simply replace our TODO Text entry with a Picker like this:
// mock data:
let allGoals: [Goal] = [
    Goal(name: "Learn Japanese"),
    Goal(name: "Learn SwiftUI"),
    Goal(name: "Learn Serverless with Swift")
]

Picker("Serving Goal", selection: $task.servingGoal) {
    ForEach(allGoals) {
        Text($0.name).tag($0 as Goal)
    }
}
This is what the TaskEditView now looks like:
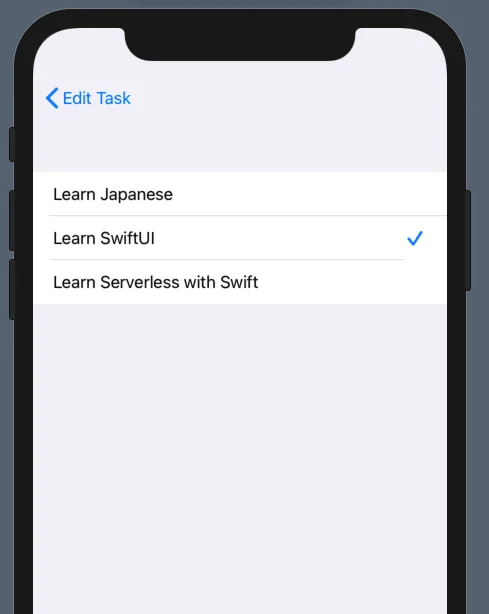
And when clicking the picker, this is the detail view:
Pretty straight-forward. Note that Goal needs to be Identifiable for this to work, that’s why I added var id: String { name } to it in the first place. For our multi-selector we want the UI to actually look pretty much the same, but instead of one, we would like to be able to choose multiple entries.
First, we need to re-create the entry in the TaskEditView, I’ve chosen the name MultiSelector as the replacement type name for Picker. Here is it’s implementation:
import SwiftUI
struct MultiSelector<LabelView: View, Selectable: Identifiable & Hashable>: View {
let label: LabelView
let options: [Selectable]
let optionToString: (Selectable) -> String
var selected: Binding<Set<Selectable>>
private var formattedSelectedListString: String {
ListFormatter.localizedString(byJoining: selected.wrappedValue.map { optionToString($0) })
}
var body: some View {
NavigationLink(destination: multiSelectionView()) {
HStack {
label
Spacer()
Text(formattedSelectedListString)
.foregroundColor(.gray)
.multilineTextAlignment(.trailing)
}
}
}
private func multiSelectionView() -> some View {
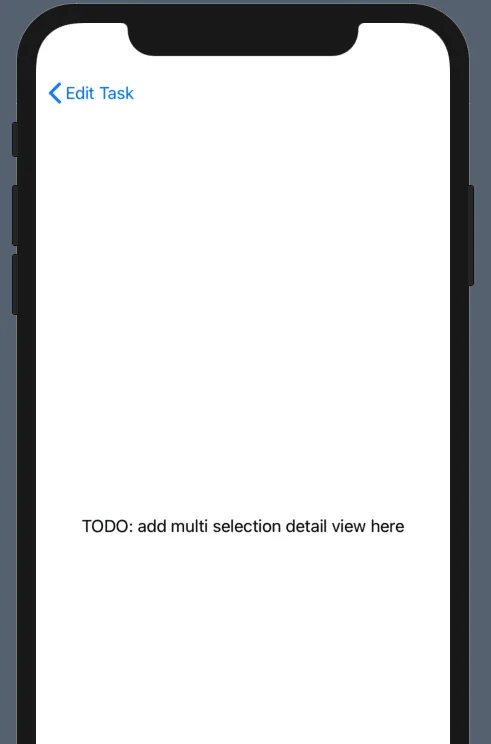
Text("TODO: add multi selection detail view here")
}
}Note that I decided to represent each entry with a String, thus the optionToString closure is needed which will provide the Stringrepresentation of the options type.
The call to ListFormatter.localizedString makes sure that we join a list of selected options together in the correct localization format (e.g. ["A", "B", "C"]becomes “A, B and C” for English).
This is the preview code I used for the view:
struct MultiSelector_Previews: PreviewProvider {
struct IdentifiableString: Identifiable, Hashable {
let string: String
var id: String { string }
}
@State
static var selected: Set<IdentifiableString> = Set(["A", "C"].map { IdentifiableString(string: $0) })
static var previews: some View {
NavigationView {
Form {
MultiSelector<Text, IdentifiableString>(
label: Text("Multiselect"),
options: ["A", "B", "C", "D"].map { IdentifiableString(string: $0) },
optionToString: { $0.string },
selected: $selected
)
}.navigationTitle("Title")
}
}
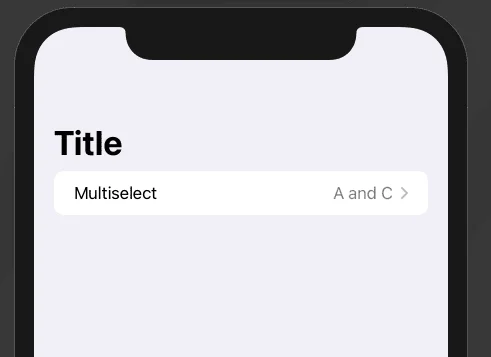
}Note that instead of Goal I used an internal type to make the preview independent from my specific project. This is what the preview looks like:
Let’s place this into our TaskEditView and see what it looks like in that context by replacing the TODO Text call with:
MultiSelector(
label: Text("Serving Goals"),
options: allGoals,
optionToString: { $0.name },
selected: $task.servingGoals
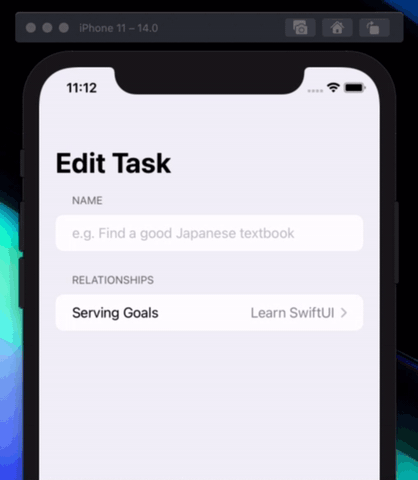
)The preview now changes to this, which looks just as expected:

But when clicking on it, we see this, which is not right yet:
Let’s implement the detail view then. I’ve chosen the type name MultiSelectionView for the detail view and this is its code:
import SwiftUI

struct MultiSelectionView<Selectable: Identifiable & Hashable>: View {
    let options: [Selectable]
    let optionToString: (Selectable) -> String

    @Binding
    var selected: Set<Selectable>

    var body: some View {
        List {
            ForEach(options) { selectable in
                Button(action: { toggleSelection(selectable: selectable) }) {
                    HStack {
                        Text(optionToString(selectable)).foregroundColor(.black)

                        Spacer()

                        if selected.contains { $0.id == selectable.id } {
                            Image(systemName: "checkmark").foregroundColor(.accentColor)
                        }
                    }
                }.tag(selectable.id)
            }
        }.listStyle(GroupedListStyle())
    }

    private func toggleSelection(selectable: Selectable) {
        if let existingIndex = selected.firstIndex(where: { $0.id == selectable.id }) {
            selected.remove(at: existingIndex)
        } else {
            selected.insert(selectable)
        }
    }
}
Except for label, this has basically the same properties. But this time, they are actually used, for example when checking if the checkmark should actually be shown by calling contains on the selected collection.
When one of the entries is clicked, toggleSelection is used on the entry to remove or insert it into the selectedproperty. For the checkmark, I’m using the SF Symbol “checkmark” which looks exactly like the checkmark icon of Picker.
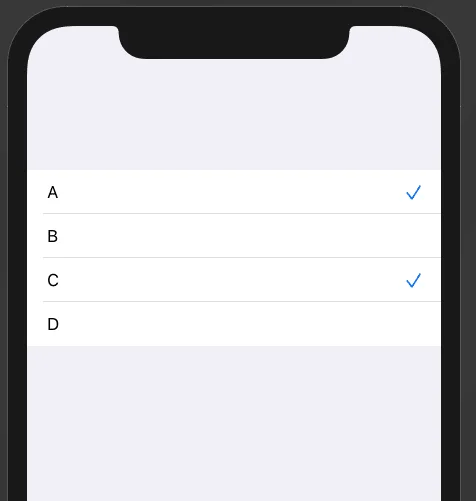
This is the preview code I’ve setup for the detail view, note that it’s pretty much a copy of the MultiSelector preview:
struct MultiSelectionView_Previews: PreviewProvider {
    struct IdentifiableString: Identifiable, Hashable {
        let string: String
        var id: String { string }
    }

    @State
    static var selected: Set<IdentifiableString> = Set(["A", "C"].map { IdentifiableString(string: $0) })

    static var previews: some View {
        NavigationView {
            MultiSelectionView(
                options: ["A", "B", "C", "D"].map { IdentifiableString(string: $0) },
                optionToString: { $0.string },
                selected: $selected
            )
        }
    }
}
This is what it looks like in the Xcode preview:
Now finally, let’s integrate our MultiSelectionView to our MultiSelector by replacing the TODO Text entry with:
MultiSelectionView(
    options: options,
    optionToString: optionToString,
    selected: selected
)
Basically, we’re just passing the data onto the detail view. But let’s see what our app looks like now in this animated GIF I recorded from the simulator:
Nice, it’s working!
I’ve uploaded the Demo project to GitHub if you want to just copy the contents of the MultiSelector and MultiSelectionView, you can find them in this folder.