
SwiftUI is getting significantly better every year. Last year (in 2022), we not only received improved navigation APIs. Apple also greatly improved the support for macOS – I would argue that the SwiftUI APIs we received for Mac app development in SwiftUI 4 are on a 1.0 level and finally allow for doing all sorts of things within SwiftUI without having to resort to AppKit for some of the most common tasks. I’ve experienced SwiftUI on the Mac while working on RemafoX using SwiftUI 3 and in some parts, it really was a nightmare.
Coming from iOS development, I was hoping not to have to learn all details of AppKit. But I had to write all sorts of hacky code to do the simplest things, like closing a window. Or disabling the full-screen button on a window. But there’s good news: By increasing my app target to macOS 13.0, I could finally do window management through SwiftUI and eliminate all the hacks I’ve had in my app.
Finally, my app feels really 100% SwiftUI-driven. And here are all the new APIs I could make use of grouped and titled by the task I wanted to achieve. As window management is probably the biggest difference between iOS and macOS development in SwiftUI times, this article could also help anyone switching from iOS to macOS to understand how window management is done on the Mac.
Opening a Window
If you are using a WindowGroup (which was the only type of window available on SwiftUI 3), with SwiftUI 4 you have two options here: The first, which was already supported before, is to use the handlesExternalEvents method like so:
enum Window: String, Identifiable {
   case paywall
   // ...
   var id: String { self.rawValue }
}

@main
struct AppView: App {
   var body: some Scene {
      // ...
      WindowGroup("Plan Chooser") { ... }
         .handlesExternalEvents(matching: [Window.paywall.id])
      // ...
   }
}
Then, when you want to open this window, you would need to open a URL like you can open any external URL but with a custom URL scheme. For example:
@main
struct AppView: App {
   @Environment(\.openURL)
   var openURL

   var body: some Scene {
      // ...
      WindowGroup(...) { ... }
         .commands {
            CommandGroup(after: .windowArrangement) {
               Button("Show Plan Chooser") {
                  self.openURL(URL(string: "remafox://\(Window.paywall.id)")!)
               }
               .keyboardShortcut("1")
            }
         }
   }
}
This method doesn’t work on the new Window type though, although it’s fully available there, too. The documentation is clear about it:
This modifier is only supported for WindowGroup Scene types.
But the second method works for both WindowGroup & Window: The new \.openWindow environment value! First, we define an id in the initializer:
enum Window: String, Identifiable {
   case paywall
   // ...
   var id: String { self.rawValue }
}

@main
struct AppView: App {
   var body: some Scene {
      // ...
      WindowGroup("Plan Chooser", id: Window.paywall.id) { ... }
      // ...
   }
}
Then, we simply pass that id to openWindow to trigger presentation manually:
@main
struct AppView: App {
   @Environment(\.openWindow)
   var openWindow

   var body: some Scene {
      // ...
      WindowGroup(...) { ... }
         .commands {
            CommandGroup(after: .windowArrangement) {
               Button("Show Plan Chooser") {
                  self.openWindow(id: Window.paywall.id)
               }
               .keyboardShortcut("1")
            }
         }
      // ...
   }
}
This is much nicer! Note that there’s also \.openDocument for DocumentGroup.
Prevent Duplicate Windows
Using id for a window does not prevent multiples of it from appearing:
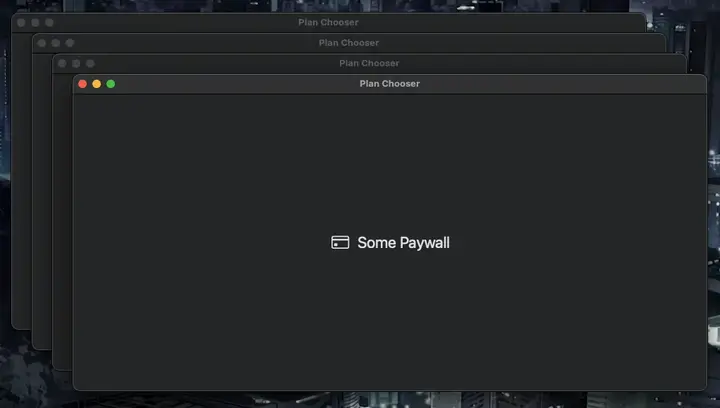
At least not for WindowGroup, but you can simply use Window to ensure multiples of a window with the same id are never created! But that’s not always an option.
A Window is much more restricted than a WindowGroup in various ways. For example, you can’t call .commands on it like I’ve done above to set some buttons in the app’s main menu. Also, Window is a macOS-only API, therefore you can’t reuse the code on iPadOS. The reason I couldn’t use it for RemafoX is the restriction I already mentioned before: Window does not support handlesExternalEvents. But I need that API because RemafoX is deeply integrated with Xcode through both an extension and a CLI tool, and those can’t make use of \.openWindow because they simply are not part of the same target. But they can still open “external” URLs!
Whatever reason you might have to prevent duplicates of WindowGroup, do this:
WindowGroup("Plan Chooser", id: Window.paywall.id, for: String.self) { _ in
   // ...
} defaultValue: {
   Window.paywall.id
}
It’s using an overloaded version of the WindowGroup initializer which takes additional for type and defaultValue arguments. It can be used to open a specific window related to any data type you want (like a Profile type), but I’m simply reusing the id of type String here to make the window unique.
In my case, I had to do this in several places, so I created this extension:
extension WindowGroup {
   init<W: Identifiable, C: View>(_ titleKey: LocalizedStringKey, uniqueWindow: W, @ViewBuilder content: @escaping () -> C)
   where W.ID == String, Content == PresentedWindowContent<String, C> {
      self.init(titleKey, id: uniqueWindow.id, for: String.self) { _ in
         content()
      } defaultValue: {
         uniqueWindow.id
      }
   }
}
With that, the above call with two Window.paywall.id calls became just this:
WindowGroup("Plan Chooser", uniqueWindow: Window.paywall) {
   // ...
}
For opening a window, we additionally pass the value param to openWindow:
Button("Show Plan Chooser") {
   self.openWindow(id: Window.paywall.id, value: Window.paywall.id)
}
Again, the multiple calls to Window.paywall.id bugged me, so I created a helper:
extension OpenWindowAction {
   func callAsFunction<W: Identifiable>(_ window: W) where W.ID == String {
      self.callAsFunction(id: window.id, value: window.id)
   }
}
Now I can simply call, even getting rid of the .id suffix:
self.openWindow(Window.paywall)Closing a Window
Now that we can (uniquely) open a window, let’s also close it. And here, the situation before was much worse than with WindowGroup, where we had some workaround within SwiftUI. There simply was no way of closing a window in SwiftUI directly. I had to implement this hack using AppKit:
struct WindowAccessor: NSViewRepresentable {
   @Binding
   var window: NSWindow?

   func makeNSView(context: Context) -> NSView {
      let view = NSView()
      DispatchQueue.main.async {
         self.window = view.window
      }
      return view
   }

   func updateNSView(_ nsView: NSView, context: Context) {}
}

@main
struct AppView: App {
   @State
   private var window: NSWindow?

   var body: some Scene {
      WindowGroup(...) {
         SomeView(...)
            .background(WindowAccessor(window: self.$window))
      }
   }
}
Then, when I wanted to close the window, I would call self.window.close().
In 2021, the \.dismiss environment value was added that allowed to dismiss presented views like sheet, popover or fullScreenCover right from within them. I’m not sure if this behavior was already available back then or added in 2022, but today the docs additionally state that the dismiss action can be used to:
Close a window that you create with
WindowGrouporWindow.
This certainly only works if there’s currently no modal view presented within the window in question. But then it works like a charm, we can just write this:
@main
struct AppView: App {
   @Environment(\.dismiss)
   var dismiss

   var body: some Scene {
      WindowGroup(...) {
         // ...
         Button("Close") {
            self.dismiss()  // <= this closes the window if no modal
         }
      }
   }
}
Disabling Full-Screen Button

Previously, I used the same hack mentioned above which gave me access to an NSWindow to do more configuration like disabling the full-screen button for views with a fixed size, like my welcome window or my about window. But now we have the new modifier windowResizability which allows us to disable the full-screen button indirectly. By default, it’s set to contentMinSize for all windows except Settings (which is a Scene type like WindowGroup). But we can do this now:
@main
struct AppView: App {
   var body: some Scene {
      WindowGroup(...) {
         SomeView(...)
            .frame(maxWidth: 400, maxHeight: 400)
         }
         .windowResizability(.contentSize)
      }
   }
}
By setting the windowResizability to .contentSize, we tell SwiftUI to more strictly follow the sizes we provide in the frame modifier. As a logical consequence, if the maximum size specified by the view is smaller than the users current screen size, then SwiftUI will automatically disable the full-screen button for us! 🪄 It’s not a very obvious or direct API, but it makes sense. Effectively, if we provide any values below 1366 by 768, which is the native size of an 11-inch MacBook Air (from 2015), we should have disabled the button for most users.
TCA Extras
If you are using The Composable Architecture (TCA) for your apps like me, you might ask yourself how you can best forward these new environment values to your reducers, as logic such as opening/closing windows should happen in those. The great community around TCA helped me solve this elegantly, in particular, Thomas Grapperon provided a type that I renamed to OnChange which you can simply copy & paste into your projects from here. Then, in your view, attach the .onChange modifier passing it any value to forward to the reducer like this:
@Environment(\.openWindow)
var openWindow

var body: some View {
   WithViewStore(...) { viewStore in
      SomeView(...)
         .onChange(of: \.$openWindow, store: self.store) { window in
            self.openWindow(window)
         }
   }
}
Note that the \.$openWindow refers to a field in the State, so we need to define it:
struct SomeState {
   @OnChange
   var openWindow: Window?
}
Now, in our reducers, we can simply set the state value to a Window enum case and the view will automatically forward the change to the @Environment value. This also works with any other SwiftUI attribute, I also used it for @FocusState!
By the way, while TCA ships with a \.dismiss dependency, calling await self.dismiss() in the reducer will (currently) not behave like the SwiftUI \.dismiss environment value and close the window. Instead, it will do nothing and even produce a warning. As a workaround, I implemented a dependency that makes use of AppKit APIs by traversing the open windows, finding the match, and closing that. You can copy & paste the Gist from here, usage looks like this:
// add the dependency to your reducer
@Dependency(\.closeWindow)
var closeWindow

// close a window in a `run` effect
return .run { _ in await self.closeWindow(Window.paywall) }
And that’s all I had to share about window management in SwiftUI 4 today!